Congratulations! If you’re reading this post it means you’ve made a decision to learn about purchasing and installing your own commercial dishwasher in your business. You can say goodbye to the expensive cost of leasing a commercial dishwasher and gain independence and huge cost savings by buying your own dishwasher (for more information about selecting the right dishwasher for your business, please read our post here). We understand that buying and installing your own commercial dishwasher can seem like a lot of work, but it’s actually quite simple! After reading this post, we are confident that you will have the information you need to install your own commercial dishwasher and start saving your business money. After all, your profits should stay in your pocket! So let’s get started!
In this post we are going to cover some basic but important topics for all types of commercial dishwashers:
-Placement and leveling your dishwasher
-Electrical power
-Plumbing
-Hot water and hot water boosters (depends on the dishwasher)
-Water quality and softener (depends on location)
-Dish tables for dirty and clean dishes
-Ventilation of steam (depends on dishwasher)
Depending on the machine you buy and where you live, there are different options for chemical pumps, hot water boosters, water softeners for hard water, and ventilation, but don’t worry- we will include information to answer all of these questions. From an existing space to a new building, we will guide you through the entire process of installation.
Placement and Leveling of machine
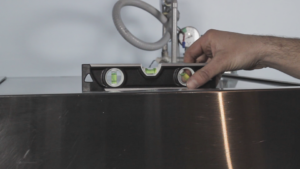
Level dishwasher machine with level.
To start, you’ll want to place the dishwasher machine in the ideal location determined by your restaurant operation, size of dishwasher (footprint), and nearby utilities. You need to take into consideration the flow of clean dishware to the tables and the collection of the soiled dishes to be taken back to the dish room. Ideally, the dishwasher should be placed in a location to streamline the flow of dishware, but not too close to a dining room where your patrons could be bothered by noise and steam. The location to utilities should also be considered, including the distance to electrical, incoming water, exit water drainage and ventilation for “high temp” machines. Sure, these utilities can be changed to accommodate any layout, but this can be costly and unnecessary.
Once in place, level the machine by adjusting the threaded legs and ensure the machine doesn’t wobble as this could cause damage during operation.
Electrical
The next step after choosing a location and leveling your machine is to connect the electrical power to the dishwasher. Before doing this, it’s always a good idea to consult a professional electrician when dealing with electrical components. Ensure electrical service to the building (either a 240V/3 phase or 110V/1 phase) matches your dishwasher requirements. Generally, “high temp” machines require the three phase electrical and the low temperature uses single phase electrical. Test that the machine can turn on and that you don’t have any issues before completing the plumbing step.
Plumbing
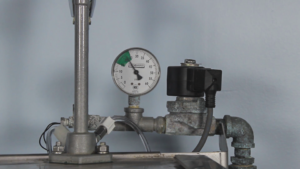
Pressure 20 psig
Now that the dishwasher is leveled and connected to electricity, it is time to complete plumbing which includes incoming water and outgoing drain water. As with the electrical it’s a good idea to consult a professional plumber to ensure you have the correct setup. Note, it’s important to install a shutoff valve at the machine for the incoming water supply. Once you connect the incoming water supply, check the water pressure. The incoming water pressure should be at least 20 psi as shown on the pressure gauge. If the pressure is over 25 psi, reduce the pressure by closing inlet valve. Luckily, most models have a pressure regulator that limits the pressure to below the max pressure specified.
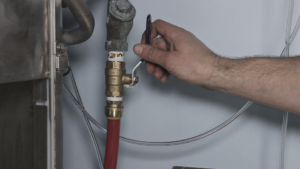
Shut Off Valve
To complete the plumbing, connect the drain tube at the bottom of the machine directly to a floor drain (you may need to purchase tubing cheaply from a local hardware store for the machine to drain easily to your floor grate). After you connect the drain, you can hook up your pre-rinse sprayer and faucet. After localizing, leveling, and connecting the electricity and plumbing, you need to consider the hot water requirements, the water quality (hard or soft water), among other requirements.
Hot Water Requirements
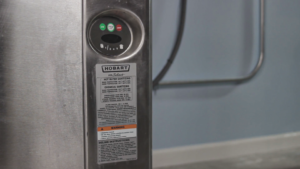
Hot Water Requirements (Hobart AM-15
Once the dishwasher is setup and connected to the electrical supply and plumbing, you need to consider the hot water requirements for your machine and whether or not it comes with a built-in hot water booster. “Low temp” machines require an incoming water temperature of 120° F minimum but a recommended temperature of 130° F. Luckily, water supplied from a normal hot water heater that supplies the entire facility with hot water is 120 – 130° F and therefore usually a booster heater is not needed. “High temp” machines require a significantly hotter incoming water of 180° F. As a result, a hot water booster is required to raise the temperature of the water from the water heater to 180° F. If your high temp dishwasher does not have a booster built-in you will have to properly size and install one to reach temperature. After the hot water is at the correct temperature in your dishwasher, you next need to consider the water quality in terms if your water is too “hard.”
Water Softener
Many areas of the country have “hard” water. “Hard” water is water that has a high mineral content from water that soaks and filters through limestone and chalk and thus has more calcium and other minerals dissolved in it. Hard water can negatively effect the detergency and effect of soaps (meaning you need more) and leaves a white film on your dishware and equipment known as lime-scale. If you are in one of these areas that has hard water, you might consider installing a water softener to cut down on your dishwasher chemical cost and improve operation of equipment.
To determine if you have hard water, contact your local water company to acquire the hardness levels of your water supply or you can buy some hardness test strips to see what range you are in. Most equipment manufacturers recommended softener if your water hardness is over 3 grains per gallon (>50 mg/L). After the water supply is connected, the hot water is supplied at the appropriate temperature, and the hardness is assessed, you can install the chemical pumps to your dishwasher.
-Picture: Find picture and insert showing lime scale on glassware and dishwasher if possible
Chemical Pumps
The next step after having electrical, and hot water of the appropriate hardness connected is to install the chemical pumps and chemical pump tubing. The chemical pumps are responsible for dispensing rinse aid, detergent and sanitizer (sanitizer is needed for low-temp machines only) into your machine at the correct time and dosage to clean your dishware. These chemicals are not optional and are very important to the final outcome of your clean dishware. Most dishwashers have these pumps built in with tubing already connected and if this is the case for your dishwasher then you can stop reading this section and continue to the next section regarding dish tables.
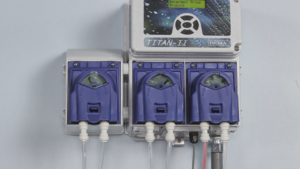
Chemical Dispenser
There are several options of pumps you can purchase online and/or through distributors. To install the chemical pump, you will need to mount the chemicals on the wall close enough to the dishwasher so the chemical supply lines can input into machine but far enough away from the pre-rinse sprayer so it does not get wet. Contact an electrician to supply power to the dispensers and to electrically connect the chemical pumps to the dishwasher. The dishwasher sends electrical signals to trigger the dispenser to add chemicals at the right time and dosage.
Lastly, you want to get the chemicals to the dishwasher by connecting the dishwasher chemicals to the dishwasher via chemical tubing. Connect the detergent pump into the fitting located at the back of dishwasher. The detergent input here will add product directly into the wash tank. Once the detergent is connected, you will connect the rinse and sanitizer from the outlet of pumps into the correct input fittings into the machine. These products are added in the final rinse step, which is the input located at the inlet of water supply line. Finally, connect the chemical supply lines to the input of the pumps and install bucket “pickup tube” that goes into the chemical container. Repeat for each pump.
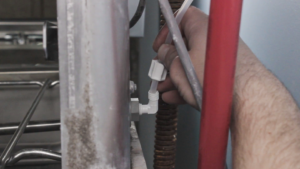
Detergent Connection
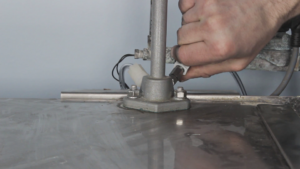
Rinse Connection
Dish Tables
To store racks of dirty dishes coming into the dishwasher and clean dishes exiting the dishwasher, separate dish tables are needed. The soiled side dishtable is for the incoming dirty dishes and should have a sprayer and faucet for pre-rinsing the dirty dishes. A commercial disposal is also a good idea to prevent drain clogs. The freshly cleaned dishes are set on the clean side dish tables, which is separate from the soiled side. It’s important to have two separate side dish tables away from one another to prevent cross contamination. Luckily, side tables for soiled and clean dishes come in a variety of arrangements and sizes such that they accommodate virtually any dish room. For instance, one application might require a L shaped soiled side and a short straight clean side or vice versa. Browse the many internet supply stores for examples of different setups and select one that will work with your space.
Attach both sides by placing the metal lip over the side of dishwasher. The tables should be level with a slight downward slope to the dishwasher so that excess water will drain back into the dishwasher which is connected to a drain in the floor. You can adjust the height and level of the side tables by the threaded legs at the bottom of the table. Once you know the placement and they are leveled, with a slight slope, apply some NSF certified sealant to the lip and reattach to machine. For added stability, attach tables to the dishwasher using screws.
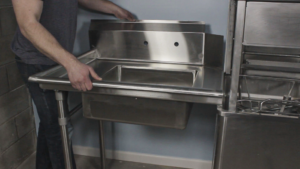
Soiled Side Dish Table
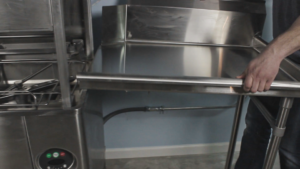
Clean Side Dish Table
Ventilation and Vent-less Models
Commercial kitchens are often hot and smoky places to work. Added steam from large dishwasher machines can add to this uncomfortable environment unless there is proper ventilation. The high temperature commercial dishwashers and subsequent hot water temperatures make a vent hood mandatory per most local codes. If you purchased this dishwasher you need to make arrangements for a vent hood or proper installed ventilation. On the other hand, if you purchased the lower temperature machines, you do not need a vent hood or ventilation installed because these dishwashers do not create a significant amount of steam and therefor do not require ventilation. A common vent hood removes this excess steam making the back-of-the-house working conditions much better and safer.
Some high temp machines are a vent-less model that condenses and recycles the excess steam in the machine and do not need ventilation. While these models have the downside of a higher price tag and slower cycle times, if installing a vent hood (and hood duct) or other ventilation isn’t a feasible in your space this might be your only option.
Conclusion
We hope that after reading that you now have all the information to install your commercial dishwasher. Remember that at first the new subject can seem intimidating but after you install you will see how easy it really is. Think about all the cost savings you will reap from not having to pay an expensive monthly bill for dishwasher maintenance.

1 Comment
Leave your reply.